Have you ever wondered how your application reacts when there is a network failure? You may be thinking your application is safe and fault-tolerant, and so did Facebook before it infamously fell victim to that illusion affecting all 3.5 billion users.
So how can you ensure your application can handle such disruptions with grace? To minimize undesirable outcomes in adverse network conditions resiliency tests must be crafted to simulate such scenarios. To engineer such conditions in your dev and test environments, ToxiProxy is a market-leading tool, in the following sections, we will explore how this can be implemented.
Toxiproxy is a network simulation tool that allows the manipulation of a connection between two services. This enables testing the behavior of systems under chaotic situations such as network connection lag or outage.
How Toxiproxy is used in testing your application
For example, if a dependent microservice is down or slow, you might want to see how your application retries to connect or how timeouts are handled. Usually testing these scenarios require a lot of manual intervention and is done ad-hoc which is inconsistent with today’s CI/CD methodology. ToxiProxy allows testers to automate these scenarios on reducing risk with every build rather than sporadically.
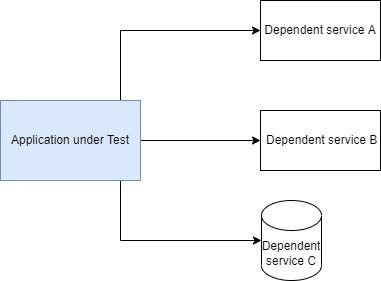
Application without toxiproxy setup

Figure 1: Architecture of system with three dependent services
In the above image, the application under test has 3 services that it will depend upon. It could be other internal microservices, external services, or database connections. From a functional testing point the questions that should be asked are, “What happens if one or many of these systems are down? How does my application respond? How Resilient is my service”. To answer these questions toxiproxy is the perfect answer.
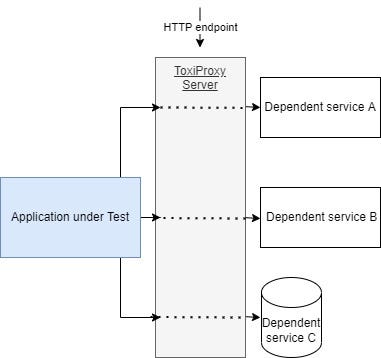
Application with toxiproxy setup

Figure 2: Architecture of figure 1 with Toxiproxy server in between connections
In the development/testing environments, the URL’s of the connection will be changed to route through the toxiproxy server rather than the actual URL of the dependent service. Once the connection is flowing through the toxiproxy server, communication with the proxy server can be established via HTTP to exhibit certain behaviour on behalf of the actual services, so the actual service doesn’t need to be taken down or manipulated in any way. If there is no command to manipulate the connection then the actual request will be proxied across to the desired dependency.
Common flow of Toxiproxy scenarios

Flows that can be implemented with Toxiproxy
The above image shows 3 ways to use Toxiproxy:
- This is the usual flow for happy path tests there are no toxics presents so everything will flow as expected.
- The request has a toxic applied to it, it could be a timeout it could be a really slow connection, based on what kind of scenario is being tested the server could eventually receive the request and send back a response. This will show how your application handles error responses or timeouts.
- The response has been poisoned on the way back from the server, the connection may be severed or the connection is being really slow. This will show any issues your application may have when waiting for the response.
Docker Compose setup
Now that we have covered some theory it’s time to get technical, below you will find examples of how to set up toxiProxy locally using docker-compose.
version: '3'
services:
  toxiproxy:
    image: "ghcr.io/shopify/toxiproxy"
    command:
      - -host=0.0.0.0
      - -proxy-metrics
    ports:
      - "8474:8474"
      - "3306:3306"
  mysql:
    image: mysql:5.6
    ports:
      - "3307:3306"
    environment:
      MYSQL_ROOT_PASSWORD: 'password'
      MYSQL_DATABASE: 'crud-application'
    volumes:
      - ./dump.sql:/docker-entrypoint-initdb.d/dump.sql
The above shows the setup of toxiproxy and mysql, the ‘mysql’ image is on port localhost:3307, which will point to port 3306 inside the container.
Proxy and toxics setup

Image showing the difference in the connections between ToxiProxy and normal setup
Once you have run the above command the server will be running on localhost:8474, sending a GET request to ‘localhost:8474/proxies’ should result in an empty object as there are no proxies configured yet. To add a proxy to the mySql image send the POST request to:
localhost:8474/proxies
{
“name”: “mysql”,
“listen”: “[::]:3306”,
“upstream”: “mysql:3306”,
“enabled”: true,
“toxics”: []
}
At this stage you want to make sure that the toxiProxy container is running and you can send requests to add proxies.
Toxiproxy Demo Repository
The above request has 5 fields as defined here, but below is a quick summary.
- Name is what you choose to give the proxy in this case I have chosen it as “mysql”.
- The port that the toxiproxy will listen on is port 3306 (which is already defined as a port for the toxiproxy containers) — this is what your local application should point to when attempting to make database calls.
- The upstream URL is the actual service where the original request will be forwarded to depending on how severe the toxics are. “mysql:3306” translates to port 3306 in the mysql container, which is the actual database URL.
- The enabled flag is a switch to turn the proxy on/off — if “true”, the request will be proxied via toxiProxy, if “false” the poxy connection will be severed resulting in a connection error (which can be used to mimic the service being down).
- The toxics array will hold the list of toxics on the dependency, it’s best to keep this empty so it can be manipulated dynamically. The available toxics are; latency, down, bandwidth, slow_close, timeout, reset_peer, slicer, and limit_data. The toxics can be both upstream or downstream so the connection could be manipulated for the request going to the server or coming out of it.
There are several clients for many programming languages that can be used in the integration testing of your application.
Before running the application under test, the dependencies might be required to be up and running, to achieve this the -config option can be used alongside a volume mount to add a predefined array of proxies.
Example of a config file:
[
  {
    "name": "mysql",
    "listen": "[::]:3306",
    "upstream": "mysql:3306",
    "enabled": true,
    "toxics": []
  }
]
Example Repo
Click here for a github repo that has an example of how to set up the docker-compose configuration and test using cucumber in a JAVA spring-boot project.
In the repo, you will find real working examples of:
- Example of docker-compose setup including Config mount and new Metrics endpoint.
- Dynamic ToxiProxySetup in the test directory.
- Feature file and steps for ToxiProxy in the test directory.
- MySQL configuration with ToxiProxy using docker-compose.
- Incorporation of the new ToxiProxy version 2.5.0, utilizing the new ToxiProxyMetrics feature.
- A readMe file that will help in setting up.

